
How to take measurements correctly and determine the size of a woman's pattern.

To make correct measurements, a woman should wear light, tight-fitting clothing, the volume of which does not affect the measurement in low-heeled shoes. A woman should stand straight in a comfortable position without straining her muscles. The arms should be lowered. To measure the length of your arm, bend your right arm at the elbow. Foot position: heels together, socks unfolded, size markings. Dimensional signs are taken while standing on the right side of the measured figure, there is no need to turn it in different directions.
Natural breathing: The measurement is carried out on a calm exhale, without retracting or protruding the abdomen on purpose.
Tape tightness: The tape should fit snugly to the body without pressing into the skin or sagging. Use a flexible centimeter tape.
To select a ready-made pattern (template size), you need a minimal but critical set of measurements that will allow you to determine your base grid size and check whether it fits your proportions. Here are the key measures, arranged by priority:
Chest Circumference (BG)
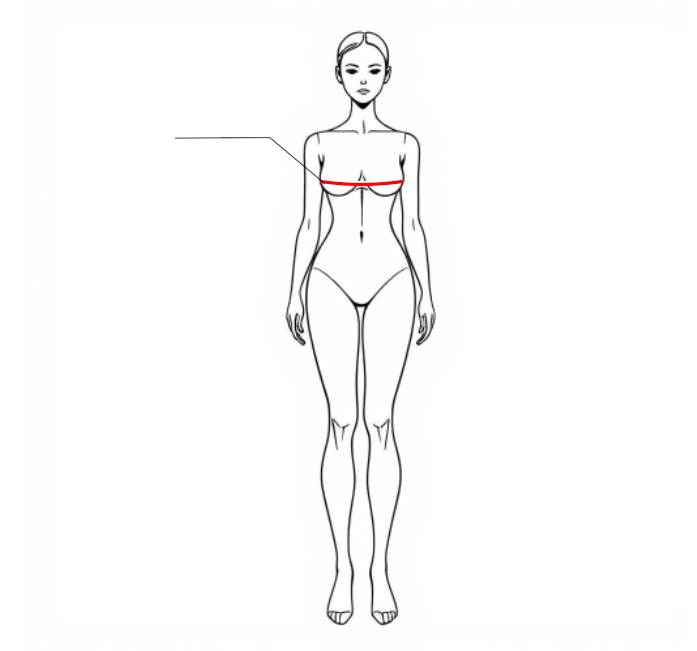
THE MOST IMPORTANT MEASURE.
The size of the pattern (especially for the top) is determined primarily by it. Measure along the most prominent points of the chest, horizontally, without stretching.
Determining the measurement level. Find the most prominent points of the mammary glands (nipples). These are the key landmarks. Take a centimeter tape.
Place the ribbon strictly horizontally around the torso, passing through both of the most prominent points of the mammary glands.
Make sure that the tape is parallel to the floor along the entire circumference of the body. It should not slide from the front or back, lift or deform.
Keep an eye on the horizontal position in front of the mirror or with the help of an assistant.
Connect the ends of the ribbon on the right side of the model’s chest (on the side of her right arm).
The tape should fit snugly to the body, but not be too tight. It should not cut into the skin and leave marks, but it should also not hang down freely. There should be a minimum clearance (approximately 0.5 cm) for free breathing.
After making sure that the ribbon is positioned correctly (horizontally, at the right level, and at the right density), secure the ends of the ribbon with your fingers on the right side of your chest.
Look at the centimeter scale at the junction of the ends.
Record the measurement with an accuracy of 0.1 cm
Waist Circumference (WC)
Required for skirts, trousers, dresses with a belt. Measure at the narrowest point or where the product’s waistline is planned.
The natural waistline is the narrowest point of the torso between the rib cage and the hip bones. This is NOT necessarily the navel level.
How to find it (2 ways):
Method 1 (physical): Ask the model to lean slightly to the side. The resulting fold of skin will be the natural waistline.
Method 2 (lace): Tie a thin, non-stretchable lace or a narrow elastic band around your waist. Let it slide freely into the narrowest place. She will take the position of her natural waist by herself. This is the most accurate method!
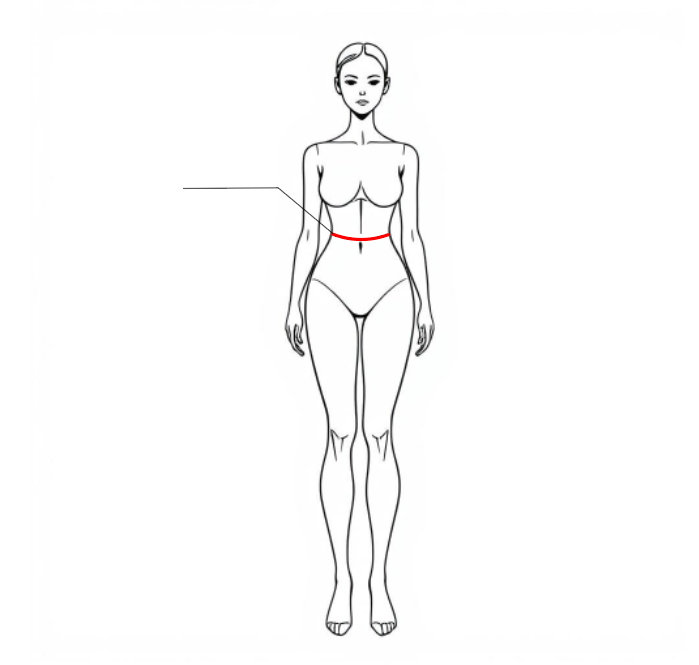
We apply a centimeter tape:
Level: Place the ribbon strictly along the found natural waistline (or along the lace).
Position: Wrap the tape around the entire torso, passing:
From behind: On the narrowest part of the back, above the buttocks.
On the sides: going down from the back to the narrowest place on the side.
From the front: through the narrowest spot on the abdomen (usually just above the navel or at its level).
Horizontal: Make sure that the tape lies strictly parallel to the floor along the entire circumference. Especially keep an eye on her from behind and from the sides. Use a mirror or an assistant. Skewing is the main mistake!
Tightness and closure:
Density: The tape should fit snugly to the body, but not CUT into the skin or pinch it. It should lie the way the belt of a skirt or trousers will lie – comfortably, but without sagging. You can check by sticking one finger under the tape – it should pass effortlessly.
Closure: Hold the ends of the ribbon together on the right side of the torso model (at waist level, approximately above the right hip).
Removing the measurement:
After making sure that the position is correct (level, horizontal, density), secure the ends of the tape with your fingers on the right side.
Look at the centimeter scale at the junction of the ends.
Record the measurement results with an accuracy of 0.5 cm or 0.1 cm.
Breathing: The measurement is performed on a calm exhale. Don’t hold your breath.
Critical moments and typical mistakes:
Incorrect level: Measuring not in accordance with the natural waistline (too high — closer to the chest, too low — on the hips) will give a completely incorrect size of the upper part of the skirt or trousers.
Lack of horizontal position: the tape slides down the back or rises on the sides/front. Always check from the back!
Incorrect density:
Too tight: the tape cuts in, the measurement is underestimated → the product will press down, causing discomfort.
Too loose: The ribbon is loose, the measure is too high → the product will slip, it will not fit well at the waist.
A strained stomach or an unnatural posture: slouching, retraction of the abdomen, weight transfer on one leg change the volume.
Heavy clothing: sweaters, jeans, belts, voluminous tights will add extra inches.
Inhaling measurement: The waist increases as you inhale.
What is this indicator for?:
Waist circumference is a key indicator for building a model:
Skirts (especially straight, trapezoidal, and scented)
Trousers (determines the fit of the belt)
Dresses (fitted silhouette, with high or low waist)
Belts and corsets
The upper part of the jumpsuit
Tip: Using a shoelace to determine the natural waistline significantly improves the accuracy of this measurement. Do not neglect this stage!
Following these instructions, you will correctly and accurately measure the «Waist circumference», which will ensure the perfect fit of the future product along the most important line.
Hip Circumference (HC)
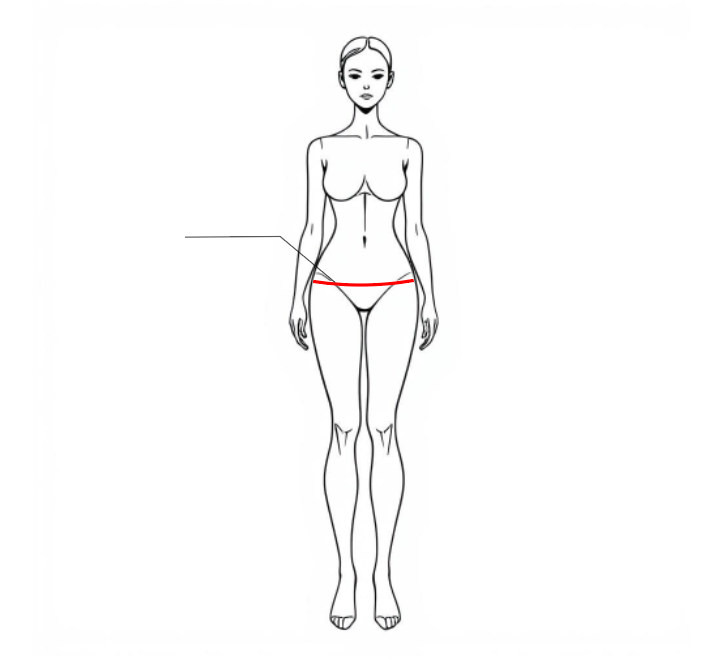
Determining the measurement level (THE MOST IMPORTANT STEP!):
The hip circumference is taken at the most prominent points of the buttocks and thighs. This is the widest part of the lower body.
How to find the level:
Stand sideways to the mirror.
From behind: Find the most prominent point of the buttocks.
On the side/From the front: Find the most prominent points of the femurs – these are bony protrusions in the upper third of the thigh, about a palm below the hip joint.
The tape level must pass through:
From behind: Through the most prominent point of the buttocks.
On the sides: Through the most prominent points of the femurs.
Front: Horizontally, at the same level as the side/rear. For most people, the abdomen is less prominent at this level than the buttocks/sides.
Tip for accuracy: Tie a thin, non-stretchable cord around the torso at the found level. Let it take its natural position at the most prominent points. This ensures a correct and horizontal level.
Applying a centimeter tape:
Arrange the ribbon strictly according to the found level (or along the lace). Wrap the ribbon around the entire torso, making sure that it passes through the most prominent points of the buttocks from behind. It passed through the most prominent points of the femoral bones from the side.
It lay horizontally in front at the same level.
Horizontal: Control from all sides! The tape should be strictly parallel to the floor along the entire circumference. It is especially important to check from the back – it should not slide down on the buttocks or rise up on the lower back. Use a mirror and an assistant.
Density: The tape should fit snugly to the body, but NOT CUT INTO or deform the soft tissues. It should fit the way a well–tailored skirt or trousers will fit — comfortably, without pinching, but also without sagging. One finger should pass under the tape with little effort.
Closure: Bring the ends of the tape together on the right side of the model’s torso, approximately above the middle of the thigh.
Taking measurements:
After making sure that the position is correct (level on the protruding points, horizontal, density), fix the ends of the tape with your fingers on the right side.
Look at the centimeter scale at the junction of the ends.
Write down the measurement with an accuracy of 0.1 cm.
Critical points and typical mistakes:
Incorrect level (BASIC ERROR):
Too high (closer to the waist) — the measure is too low, the product will be tight on the hips / buttocks.
Too low (in the middle of the hips) — the measure is underestimated, the product will «slide» down, not hold on to the waist.
Lack of horizontal position: The band slides down on the buttocks or rises from behind on the lower back. Rear control is required!
Incorrect density:
Too tight: The ribbon cuts in, the measure is too low → the product will be terribly tight in the hips and buttocks.
Too loose: The ribbon is loose, the measure is too high → the product will be baggy, sloppy.
Tense buttocks or an unnatural posture: Tucking of the buttocks, misalignment of the pelvis, weight transfer on one leg.
Thick or bulky clothing: Jeans, skirts, voluminous tights, sweaters tucked into trousers, cardigans.
Ignoring the protruding points of the femurs from the side: The ribbon runs below the skewers → the measure is low, the trousers will press in the hips.
What is this measure for?:
Hip circumference is an absolutely necessary basic measure for building:
Skirts (of all types and styles)
Trousers (determines the volume in the hips and buttocks)
Dresses (especially fitted and straight silhouettes)
Overalls
Underwear shorts (bodysuits, underpants)
Following these instructions, you will measure the «Hip circumference» as accurately as possible, which will ensure an ideal fit and comfort of the product in the most voluminous part of the figure.
Why aren't these measurements ENOUGH for a perfect fit? (Important to check!) By choosing the BG/WC/HC size, you get a basic starting point. But in order for the product to fit well, be sure to check the reference vertical measurements of the pattern.:
Back Waist Length (BWL)
If your measure is significantly larger / smaller than indicated in the pattern of your size, the back will «slide» or «bulge», length correction will be required.
The length from the back to the waist is critically important for the construction of shoulder products (dresses, blouses, jackets), as it determines the balance and fit of the figure on the back.
What are the BWL sizes?:
The distance in a straight line from the cervical vertebra (C7) to the waistline along the spine.
Necessary equipment:
Soft centimeter tape (non-stretchable).
Elastic band (for precise definition of the waistline).
Assistant (required! It is definitely impossible to take this measure yourself).
A small, easily erasable marker or pencil (optional, for applying dots).
Procedure of actions:
Relax your shoulders and back. Don’t slouch or straighten up unnaturally.
Define your waistline: tie a thin cord around your natural waist (the narrowest part of your torso). Let him get into the right position. This is a mandatory stage!
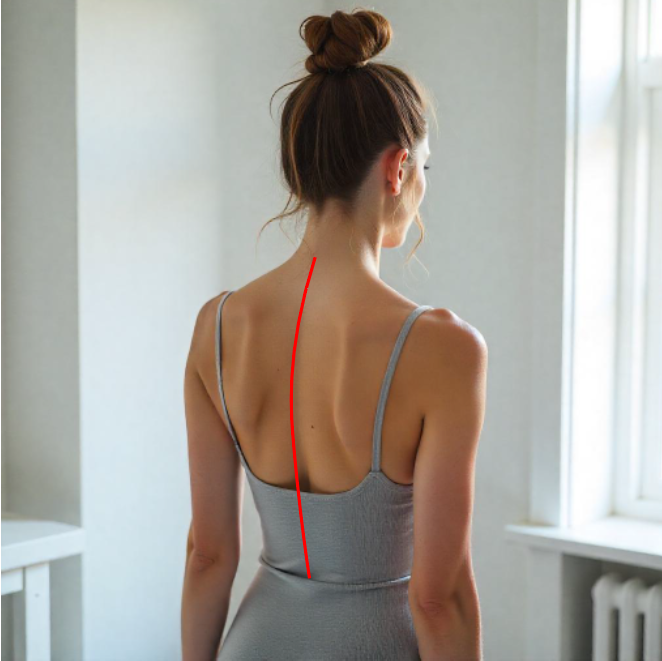
Find the key points:
Point A (Upper): Seventh cervical vertebra (C7).
Ask the model to tilt her head slightly forward.
Feel for the most prominent bone bump at the base of the neck, where it passes into the back. This is C7.
(If it is difficult to find: the point is approximately at the level of the shoulder seams at the back).
Point B (Lower): The intersection of the spine line with the waist line (defined by the lace).
Find the center of the back along the spine at the level of the waist lace.
Taking measurements:
The assistant stands on the side or behind the model.
The zero end of the centimeter tape is pressed tightly against point A (C7).
The ribbon is strictly vertically lowered down along the spine line.
The other end of the ribbon is pressed against point B (the spine at the level of the waist lace).
Check:
Verticality: The tape should run strictly perpendicular to the floor, without deviations to the left/ right. You can use a plumb line or a level for control.
Tight fit: The ribbon should lie on the back, repeating its natural curve, but without cutting or sagging. It should just touch the skin along the spine.
Points: Make sure that the ribbon starts exactly at C7 and ends exactly at the intersection of the spine and the waist lace.
Taking measurements:
The assistant fixes the position of the tape at point B and looks at the scale opposite point A (or vice versa if the tape is pressed against C7).
Write down the measurement with an accuracy of 0.1 cm. For example:
Breathing: The model should stand naturally and breathe calmly. The measurement is taken on a calm exhale.
Critical points and typical mistakes:
Incorrect definition of point C7: The most common mistake. The measurement does not start from the most prominent vertebra (C7), but above (closer to the skull) or below. This leads to a significant margin of error.
Incorrect definition of the waistline: It’s easy to make mistakes without a shoelace. The measurement should end at the natural waistline, and not at an arbitrary level (for example, at the navel or under the breast).
Lack of verticality: The band deviates from the line of the spine to the left or right, especially in the area of the shoulder blades or lower back. This gives an overestimated measure.
Sagging or tension of the ribbon:
Sagging: The ribbon does not repeat the curve of the back, but forms an arc → the measure is too high.
Strong tension: The tape cuts into the skin or unnaturally straightens the curve of the spine → the measurement is underestimated.
Incorrect posture: Slouching, deflection in the lower back, raised or strained shoulders change the length of the back.
Thick clothes: Sweaters, thick T-shirts add extra millimeters/centimeters.
What this measurement (Back Waist Length) is for:
Product balance: It is critically important for the correct balance of the shoulder product (so that the backrest does not «lift» up at the neck and does not «slide» down at the waist, but sits straight).
Tip: If you are taking measurements for a complex product or the model has specific posture (strong stoop or deflection), additionally take measurements of the Front Waist Length (FWL). Comparing BWL and FWL helps to accurately adjust the pattern to an individual figure.
Following these instructions, you will measure the «Back Waist Length» accurately and correctly, which is the key to an excellent fit of the top of the product on the back.
Front Waist Length (WD)
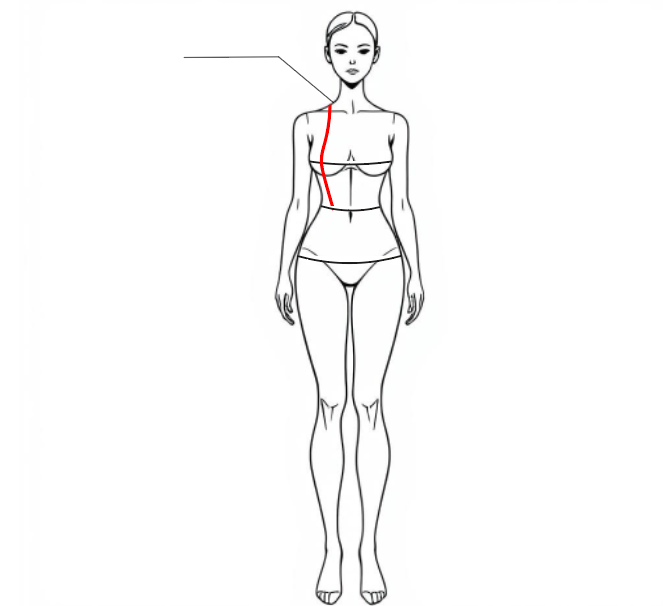
The standard method is from the shoulder point. Here are detailed instructions on how to measure the Front Waist Length correctly.:
It will be very difficult to take this exact measure yourself.
1.Find the Starting Point: Find the highest point of the shoulder (the point at the base of the neck at the shoulder seam). This is the place where the neck passes into the shoulder, usually above the collarbone, where the seam of the shoulder of a shirt or dress is. This is the point «A».
2. Identify the Breast Point: Find the most prominent point of the breast (bust point), usually the nipple or the center of the breast. This is the «B» point. Important: The ribbon must pass through this point.
3. Determine the Waistline: Find the natural waistline of the person. This is the narrowest part of the trunk above the navel. This is usually the place where the torso bends slightly when leaning sideways. You can tie a thin elastic band or lace around your waist so that it fits into the narrowest place and is strictly horizontal to the floor. This is the «C» point.
4.Prepare a centimeter tape: take a centimeter tape. The beginning of the ribbon (the zero mark) will be at point «A».
5. Place the zero mark of the centimeter ribbon exactly at the highest point of the shoulder (point «A»).
6. Run the ribbon over the chest area: Run the ribbon down the front of the body, making sure that it passes through the most prominent the point of the chest (point «A»). The tape should fit snugly to the body, but not squeeze the chest. It should follow the natural contour.
7. Continue moving towards the waistline: continue to direct the ribbon vertically down to the natural waistline (point «C»). Make sure that the ribbon runs strictly vertically down from point «B» to point «C», without deviating either forward or backward.
8. Fixing the result: When you reach the waistline, fix the position of the ribbon. Fix the centimeter reading at the point where the ribbon crosses the waistline (point «C»). This is a «front to waist» measurement.
9. Vertical control: Make sure that the tape on the back (between points «A» and «B») and on the stomach (between points «B» and «C») runs as vertically as possible. Ask the assistant to check if the tape is sagging on the back.
The main points to consider when performing the procedure are:
Posture: A person should stand straight, but relaxed, without retracting the abdomen or sticking out the chest.
Vertical: The tape should be positioned vertically throughout the measurement, especially in the area between the chest and waist.
Chest circumference: For a proper fit of the upper part of the product, it is important to ensure that it passes through the most prominent point of the chest (bust point).
Waistline: Accurate definition of the natural waistline is a guarantee that the measurement will be made in the right place.
Tape tension: The tape should lie on the body without sagging, but also without tension. It should simply follow the contour of the body.
Assistant: Having an assistant who can check the verticality of the tape from the back and the correctness of passing through the chest significantly increases accuracy.
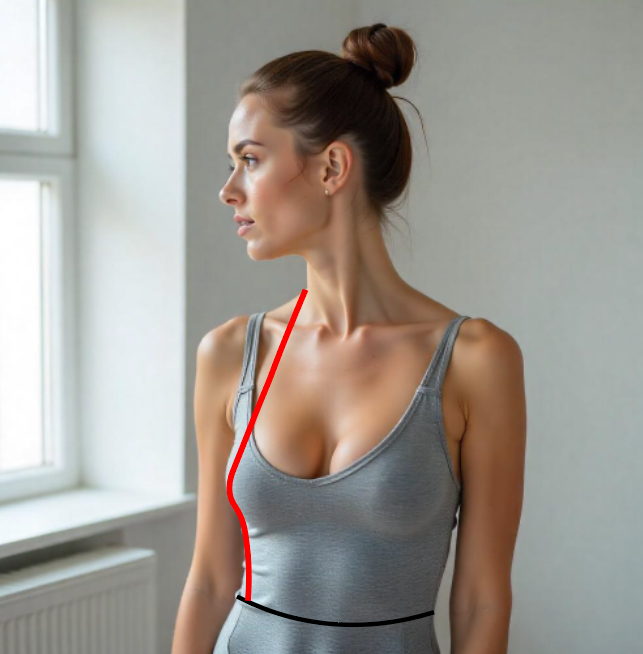
4.Prepare a centimeter tape: take a centimeter tape. The beginning of the ribbon (the zero mark) will be at point «A».
5. Place the zero mark of the centimeter ribbon exactly at the highest point of the shoulder (point «A»).
6. Run the ribbon over the chest area: Run the ribbon down the front of the body, making sure that it passes through the most prominent the point of the chest (point «A»). The tape should fit snugly to the body, but not squeeze the chest. It should follow the natural contour.
7. Continue moving towards the waistline: continue to direct the ribbon vertically down to the natural waistline (point «C»). Make sure that the ribbon runs strictly vertically down from point «B» to point «C», without deviating either forward or backward.
8. Fixing the result: When you reach the waistline, fix the position of the ribbon. Fix the centimeter reading at the point where the ribbon crosses the waistline (point «C»). This is a «front to waist» measurement.
9. Vertical control: Make sure that the tape on the back (between points «A» and «B») and on the stomach (between points «B» and «C») runs as vertically as possible. Ask the assistant to check if the tape is sagging on the back.
The main points to consider when performing the procedure are:
Posture: A person should stand straight, but relaxed, without retracting the abdomen or sticking out the chest.
Vertical: The tape should be positioned vertically throughout the measurement, especially in the area between the chest and waist.
Chest circumference: For a proper fit of the upper part of the product, it is important to ensure that it passes through the most prominent point of the chest (bust point).
Waistline: Accurate definition of the natural waistline is a guarantee that the measurement will be made in the right place.
Tape tension: The tape should lie on the body without sagging, but also without tension. It should simply follow the contour of the body.
Assistant: Having an assistant who can check the verticality of the tape from the back and the correctness of passing through the chest significantly increases accuracy.
Neck circumference (NC)
Measuring the circumference of the neck correctly is very important for sewing clothes or buying things with a collar (shirts, dresses, sweaters). Here is a step-by-step instruction:
How to take a measurement:
1. Stand up properly: Stand up straight in a natural, relaxed position. Lower your arms along your body. Look straight ahead (do not tilt or tilt your head, do not pull your chin into your neck). Breathe normally.
2. Find the correct position of the tape:
The ribbon should run around the base of the neck.
In front: It should lie just above the jugular notch (the fossa at the base of the neck between the collarbones), approximately where the shirt collar usually ends.
From behind: The ribbon should run along the most prominent cervical vertebra (usually the 7th cervical vertebra, which protrudes the most when you tilt your head forward).
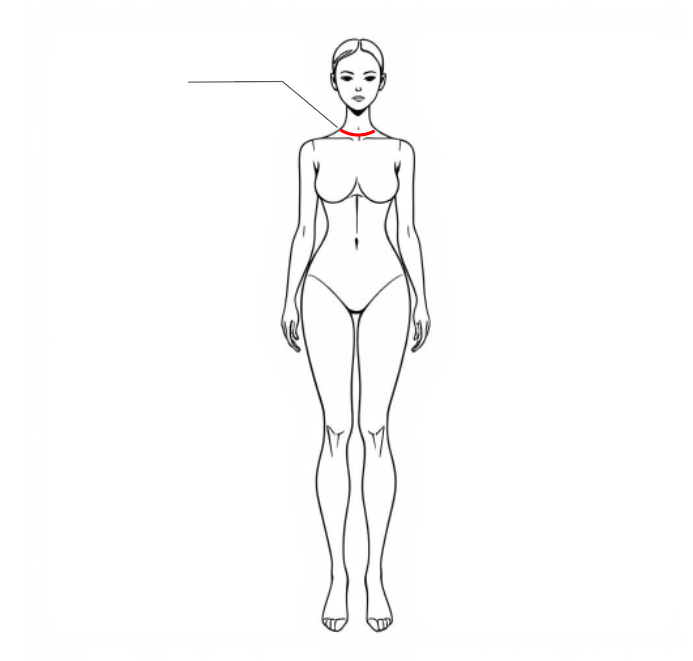
3. Position the ribbon horizontally: Make sure that the ribbon lies flat along the entire circumference of the neck, without bending up or down. It should be strictly parallel to the floor.
4. Determine the tension correctly: This is the most important moment!
Do not tighten the tape tightly! It should fit snugly but comfortably to the skin.
Check: One finger (index finger) must pass freely under the tape. This will provide the necessary freedom for movement and comfortable wearing of the collar.
Imagine that you are measuring your neck for a collar that should not put pressure on.
5. Take readings:
Look at the scale of the centimeter tape at the point where the zero mark (or the beginning of the tape) meets the rest of the tape running around the neck.
Following these steps, you will take an accurate measurement of your neck circumference.
Upper arm circumference
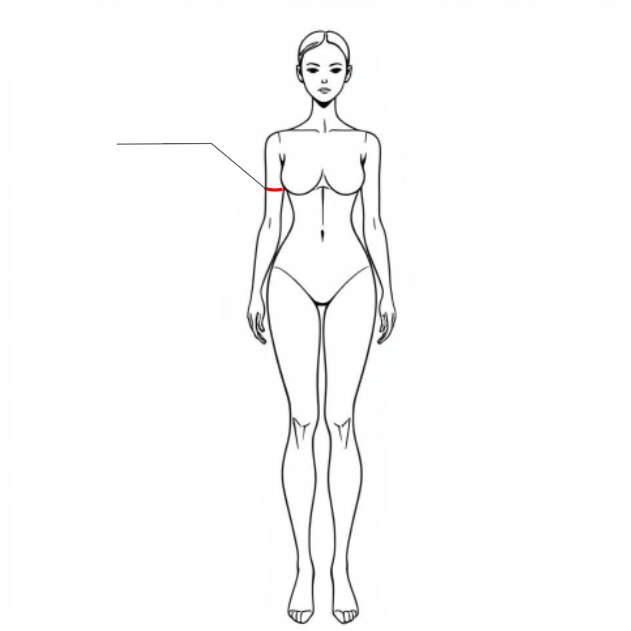
Shoulder girth (measurement for shoulder products): Measured horizontally on the arm in a free position along the body, at armpit level.
Forearm girth: at the widest part of the forearm.
Human position:
Standing up. Legs together, arms loosely lowered along the body.
The shoulders are relaxed.Do not strain your shoulder muscles, do not lift or pull your arm back or forward.
A natural pose. Do not intentionally straighten up or slouch.
1. Find the starting point: determine the posterior corner of the armpit (the uppermost point of the axillary fold on the back, where the arm and torso meet).
2. Tape position:
Circle the ribbon horizontally around your arm (right or left, depending on which arm you are measuring) in the area directly under the armpit.
The band should lie in a plane strictly perpendicular to the axis of the shoulder (an imaginary line running from the shoulder joint to the elbow). Imagine that the ribbon forms a perfect ring around your arm, parallel to the floor.
The upper edge of the centimeter tape should touch the starting point tightly — the back corner of the armpit. This is the most important landmark!
The tape should run over the entire surface of the arm, including the bulge itself.
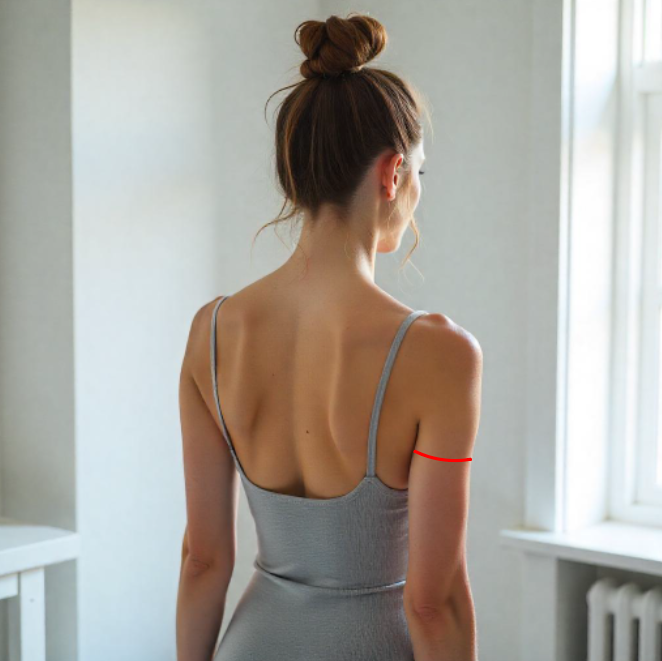
3. Recording of measurement results:
Make sure that the tape lies flat, without distortion, does not rest against the shoulder blade / chest and does not sag.
It should fit snugly around the arm, but not cut into the skin or stretch the muscles. Your finger should pass freely between the tape and your hand (considering the thickness of the fabric of the product).
Secure the tape to the outside of your arm (in the most prominent part of your shoulder), not under your arm or in front.
Make sure that the tape does not move from the top edge to the back corner of the armpit.
Read the meaning on the ribbon in the place where it covers the outside of your palm.
Key points and common mistakes:
Horizontality and perpendicularity: the most important thing! Any tilt of the tape (forward, backward, up, down) will result in inaccurate measurements.
Tight fit: The band should not hang loose, but it should also not obstruct blood flow or deform muscles. Consider future freedom of movement.
Relax your arm: Tense muscles or a withdrawn arm will significantly increase the girth.
Measuring both hands: If there is significant body asymmetry (for example, due to physical activity), be sure to measure both hands separately.
Clothing: Take measurements over thin underwear (T-shirts) or on bare skin! Coarse or thick clothing (sweater) will distort the result.
Compliance with this technique will ensure the accuracy of the sleeve construction and a comfortable fit of the product in the shoulder area.
Shoulder width (SW)
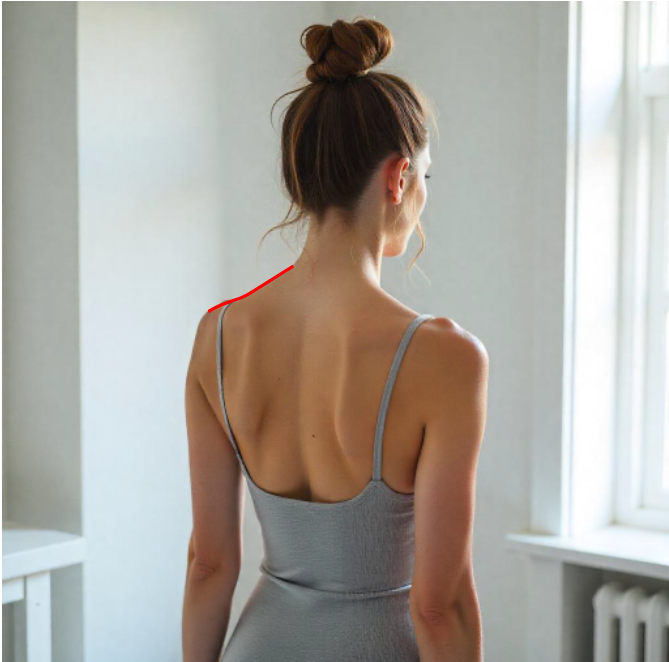
To properly take the measurement of Shoulder Length (also often called «Shoulder Slope Length»), which is used when sewing clothes, follow these instructions:
What we measure: The distance from the base of the neck to the extreme point of the shoulder joint (humerus), where theoretically the sleeve seam should begin or the shoulder seam of the product should end.

How to measure shoulder length correctly:
Pose for measurement accuracy:
The measured person should stand straight and naturally, maintaining a normal posture (without slouching or straightening up intentionally).
The shoulders should be completely relaxed, the arms should be freely lowered along the body.
Recommendation: To achieve maximum accuracy, ask another person to perform this measurement.
1. Find a starting point:
Determine the point of the base of the neck at shoulder level. Feel the bone protrusion at the end of the collarbone at the base of the neck from the side — the starting point is just above and from it to the neck. This is a depression (fossa) between the base of the neck and the beginning of the shoulder muscle, located on the side. This is the uppermost point on the shoulder slope line.
2. Determine the end point:
Find the shoulder joint — this is the most prominent bone in the place where the shoulder connects to the arm (the head of the humerus). When the hand is lowered, it can be felt well.
Amendment: This is the place where, according to the rules of construction, the shoulder seam of the sleeve usually ends.
3. Take a measurement:
Carefully lay a centimeter tape along the surface of the shoulder, connecting the found starting and ending points.
The centimeter band should exactly follow the natural curve (slope) of the shoulder from the neck to the joint. It should not sag in the air or cut into the body, but should fit snugly along the contour.
Important: Measure strictly along the line where the shoulder seam of the product will pass.
Typical mistakes:
Shoulders are raised or tense.
The tape is sagging or too tight.
The starting or ending point was incorrectly found (too close to the neck or too far on the arm).
The arm is bent at the elbow or pulled to the side.
A properly measured Shoulder Length is a guarantee that the shoulder seam of future clothing will fit perfectly without slipping or cutting into the neck.
Length from waist to floor on the side
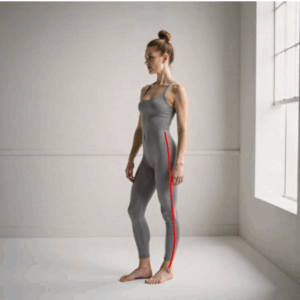
The rules for measuring «Length from the waist to the floor from the side»
You will need an assistant (it is very difficult to remove it yourself).
Step-by-step instructions:
Stand up straight, without tension, naturally. Keep your feet together or slightly apart (as you usually stand).
Spread your body weight evenly on both legs.
1.Put a belt or elastic band around your waist. It should be positioned strictly horizontally around the torso at the narrowest point of the waist (or where the upper part of the skirt / trousers will be located). This is the key moment! The belt should run along the side points of the waist.
2. Determine the measuring point from the side:
Find a point on the side at waist level. This is the side point of the waist. Your belt should go through it.
3. The assistant stands to your right.
The zero end of the centimeter tape is applied strictly to the lateral point of the waist (where the belt intersects the lateral line of the body).
The tape descends vertically downwards:
It should run strictly perpendicular to the floor.
Swipe along the side of the thigh and shin, following the natural contour, but without sagging or cutting into the body.
Don’t lean forward or backward!
Lower the tape all the way to the floor.
Read the value at the point where the ribbon touches the floor (vertically below the side point of the waist).
4. Make sure that the tape is actually positioned vertically.
Check whether the ribbon passes through the side point at waist and hip level and lies loosely along the leg on the floor.
Important nuances:
Waist point: An error in determining the waist level from the side will lead to an incorrect length of the product. The belt helps to accurately fix this level.
Verticality: The slightest tilt of the tape forward or backward will distort the result. Keep a strict eye on this.
Posture: A person should stand naturally, without slouching or sticking out his stomach/hips.
Asymmetry: Many people have a slight asymmetry (one hip/shoulder is slightly higher than the other). If the difference is noticeable, sometimes measurements are taken on both sides and the average value or the value for the more «problematic» side is used. For products with high accuracy (especially for trousers), both measurements may be required.
What is this measurement used for?:
Skirts: Determines the total length of the skirt from the waist along the side seam (especially for straight, asymmetrical or long skirts).
Trousers: The main indicator for determining the length of trousers by the side seam. Based on this (taking into account the desired shoe fit, leg width and model), the final length of the product is calculated. Often, the length of trousers is made 0.5-3 cm shorter than this measure (depending on the shoe model and style), so that they «lie» beautifully on the shoes, and do not drag along the floor.
Dresses: When sewing dresses of some styles (for example, a straight silhouette).
Carefully take measurements, and you will have the exact basis for creating skirts and trousers that will fit perfectly!
Pitch length, Inner seam length
The rules for measuring the «Step seam length» (step length, inner seam length):
An assistant is required, it is definitely impossible to remove it yourself.
Clothing: A person should wear underwear or tight-fitting leggings that do not add volume to the groin area
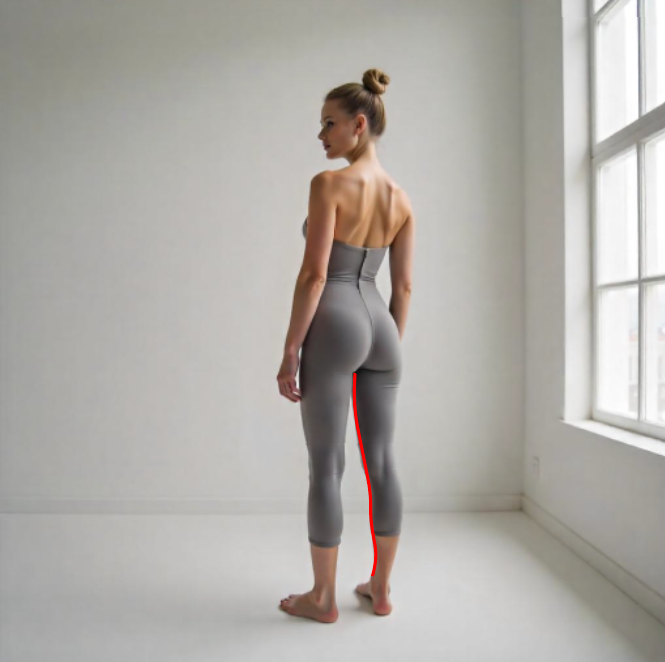
1. Stand up straight, naturally, without tension. Back straight, shoulders relaxed.
Feet shoulder-width apart (or slightly wider, about 15-20 cm apart). This is VERY important! If the legs are brought together, the measurement results will be distorted to a lesser extent.
The weight is evenly distributed on both legs.
It is important to tie a thin elastic band or belt at the level of the natural waist (the narrowest part of the torso) or at the level where the upper part of the trousers is outlined. This will help you control your posture and lifting level.
2. Determining the starting point:
The starting point is located strictly in the groin area, at the uppermost point of the inner fold between the shin and the trunk, where the legs converge. This is the point where the step seam of the finished trousers will be located (the junction of the front and back halves on the inside of the leg).
3. Taking measurements:
The assistant stands next to you (most often it is more convenient to be on the side of the measured foot).
The zero end of the centimeter tape is applied to a specific point in the groin.
Method A (more accurate): Place your finger on the top of the groin fold (as described above). Position the zero end of the tape a centimeter from the tip of this finger, without removing your finger. The ribbon will run next to the finger down.
Method B: Carefully attach the zero end of the tape directly to the uppermost point of the groin crease.
The tape runs vertically down the inside of the leg:
It should run strictly vertically (perpendicular to the floor).
Ask the assistant to run a centimeter along the inner surface of the thigh, knee and shin, following the natural contour, but without sagging or cutting into the body. Don’t pull on it!
Don’t lean forward or backward! Run it parallel to the imaginary inner seam of the trousers.
Determine the end point:
Towards the floor: the tape descends until it touches the floor. This is the main measurement for the calculation.
4. Check the correctness of its execution:
Make sure you stand straight with your feet shoulder-width apart.
Check the vertical position of the tape. Look from the front and side.
Make sure that the tape is not stretched or sagging.
Important nuances:
1. The «feet shoulder-width apart» pose: this is the most common mistake! If the legs are brought together, then the measurement will be much shorter than the real one. The trousers will «pull up» and sit down with each step. Spread legs in a relaxed state will give a natural length.
2. Starting point: The groin point should be the topmost point of the crease, not somewhere on the thigh above or below. A 1-2 cm error here will result in the wrong length of the entire seam.
3. Vertically: the tape should go straight down, without tilting forward/backward. Leaning forward will lengthen the measure, and leaning back will shorten it.
4. Tape tension: The tape should just lie along the leg, without tension. Tension will reduce the size, sagging will lengthen it.
5. Asymmetry: People often have slight asymmetry in their legs. For important things (especially tight-fitting trousers), measure both legs and use the value for the longer leg or the average value if the difference is small. Write down the difference, if any.
What is this measurement used for?:
Trousers: This is the main indicator for determining the length of trousers along the inner seam. It is critically important for a comfortable fit. A pattern of trousers is being developed on its basis. The length of the finished product in a step is usually equal to the measured minus 1-3 cm (depending on the style and shoes), so that the trousers do not «stand on a stake» and sit beautifully on the shoes.
Shorts: The length of the shorts is determined by the inner seam.
Overall: When designing the lower part.
Remember: The accuracy of determining the length of the step seam directly affects the comfort of wearing trousers! The «feet shoulder-width apart» pose and the right shoes are key success factors.